19. CodeLess™ AT Commands
The CodeLess™ AT Command platform allows you to control the BLE connectivity of DA1453x and DA1458x devices without having to write a single line of code - you simply send ASCII based commands to the device via the UART.
- More information about the CodeLess platform, including the commands it supports, can be found in the following:
This chapter provides a brief getting started guide to CodeLess, showing you how to get CodeLess running on your DA14531 or DA1453x DEVKT-P. We will deomstrate how a PC, running a terminal emulator such as TeraTerm etc., can be used to send AT commands to the Development Kit and to display any response received.
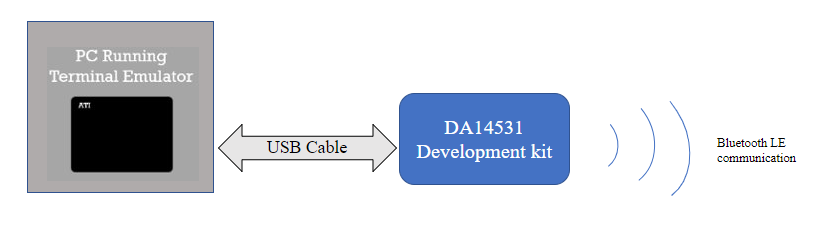
Figure 52 CodeLess Getting Started Configuration
- There are four simple steps to get CodeLess running on your DA14531 oe DA1453x DEVKT-P, detailed in the following sections:
Prepare the Development Kit
Program the Development Kit
Configure the Terminal Emulator
Send AT Commands to the DA1453x
19.1. Preparing the Development Kit
The first step is to prepare your development kit so that the UART on the DA1453x can communicate with the PC from which commands will be sent. Exactly how to do this depends upon the development kit you have. Go to the relevant sub-section below and ensure your kit is configured correctly.
Warning
CodeLess cannot be used on the USB Development Kit.
19.1.1. DA14531 DEVKT-P(DA14531 Tiny Module)
When using a DA14531 DEVKT-P to run CodeLess on DA14531 module ensure that the jumpers on the board are configured as shown below:

Figure 53 DA14531 Module with DA14531 DEVKT-P CodeLess Configuration
The DA14531 Module is now configured to run CodeLess. The next step is to program a CodeLess binary into the board, proceed to the Programming section for details.
19.1.2. DA1453x DEVKT-P (DA14535 Tiny Module)
When using a DA1453x DEVKT-P to run CodeLess on DA14535 Module ensure that the jumpers on the board are configured as shown below:

Figure 54 DA14535 Module with DA1453x DEVKT-P CodeLess Configuration
The DA14535 Module is now configured to run CodeLess. The next step is to program a CodeLess binary into the board, proceed to the Programming section for details.
19.1.3. DA14531 DEVKT-P(DA14531 daughter board)
- When using the DA14531 DEVKT-P to run CodeLess on DA14531 daughter board, four jumper wires need to be connected to the board as follows:
Pin 17 on J1 [
UTX] to pin 27 on J2 [P26]Pin 15 on J1 [
URX] to pin 26 on J2 [P25]Pin 13 on J1 [
URTS] to pin 28 on J2 [P27]Pin 11 on J1 [
UCTS] to pin 29 on J2 [P28]
In addition, ensure that the jumpers on the board are configured as shown below:

Figure 55 DA14531 DEVKT-P PRO CodeLess Configuration
The DA14531 device is now configured to run CodeLess. The next step is to program a CodeLess binary into the board, proceed to the Programming section for details.
19.1.4. DA1453x DEVKT-P(DA14535 daughter board)
- When using the DA1453x DEVKT-P to run CodeLess on DA14535 daughter board, four jumper wires need to be connected to the board as follows:
Pin 17 on J1 [
UTX] to pin 27 on J2 [P06]Pin 15 on J1 [
URX] to pin 26 on J2 [P05]Pin 13 on J1 [
URTS] to pin 28 on J2 [P07]Pin 11 on J1 [
UCTS] to pin 29 on J2 [P08]
In addition, ensure that the jumpers on the board are configured as shown below:

Figure 56 DA1453x DEVKT-P PRO CodeLess Configuration
The DA14535 device is now configured to run CodeLess. The next step is to program a CodeLess binary into the board, proceed to the Programming section for details.
19.2. Renesas Smartbond Flash Programmer
Now that the development kit has been correctly configured it must be programmed with a CodeLess binary file. There are a number of programming tools that can be used to do this, however we recommend using the Renesas Smartbond Flash Programmer.
- Click on the appropriate link below to download and install the Flash Programmer.
Renesas Smartbond Flash Programmer for Windows/Linux and macOS OS
Once installation is complete, connect the DA1453x DEVKT-P and DA14535 device to your PC and then start the Flash Programmer.

Figure 57 SmartBond Flash Programmer
Next, download the CodeLess binary file from the Renesas Website. To do this, click the Online Resources button and select the CodeLess DA14531 Standalone Set Two Hex file, then press Download.

Figure 58 CodeLess File Download
Warning
Make sure about your internet connection in order to download the CodeLess binary.
Finally, program the downloaded binary file into the DA1453x devices. To do this, click on the check box next to the JTAG serial number of your board and then press the Program button.

Figure 59 CodeLess Programming
When programming is complete, you will see a message stating Starting application on chip in the Log window.

Figure 60 CodeLess Programming Complete
Note
Due to the limited amount of memory available on the DA14531, not all of the available CodeLess AT Commands can be supported by a single binary file. For this reason three different binary files are available; Datapump, Standalone and Standalone Set Two. A list of the commands supported by each of these files can be found here.
19.3. Terminal Emulator Configuration
Now that the hardware has been configured, and devices programmed with the CodeLess binary file, the final step is to setup the Terminal Emulator that will be used to send AT commands to the board. In the following section we will use a free terminal emulator, Tera Term. Tera Term can be downloaded from https://osdn.net/projects/ttssh2/releases/, but you can use any terminal emulator that you are comfortable with (PuTTY, RealTerm etc.).
First, start Tera Term, select the appropriate Serial Port as shown below, then click ‘OK’:

Figure 61 TeraTerm Port Selection
Now open the port configuration window by selecting
Setup->Serial Portas shown below:
Figure 62 TeraTerm Port Configuration Window
Finally, configure the serial port to use the following settings, and then click ‘OK’:
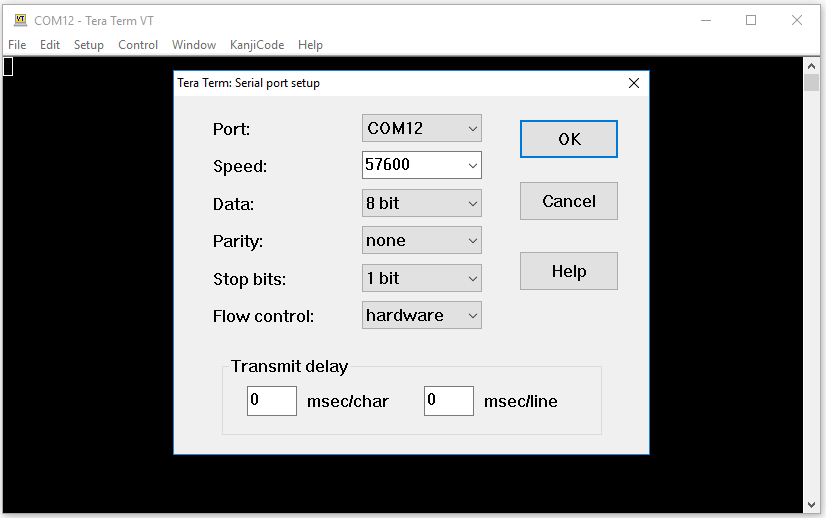
Figure 63 TeraTerm Port Settings
19.3.1. Sending AT Commands
You are now ready to send AT commands to the DA14531 Development Kit Board. To test the interface is working, type the command ATI into the terminal emulator window and you will see a response giving the version number of CodeLess that the DA14531 is running:

Figure 64 CodeLess ATI Command Response
You now have the CodeLess AT command platform running on your DA1453x Devices. The next step is to explore the supported commands and to try out some examples.
- See the following links for a full list of all the supported commands and some CodeLess examples:
CodeLess AT Command Set binary files
For this demonstration we programmed the DA14531 with the CodeLess Standalone SET-TWO binary file. The source code for this, and the other, CodeLess AT Command Set binary files is available within the CodeLess SDK. This can be downloaded using the link provided in the Software Resources section of the CodeLess Product Page.